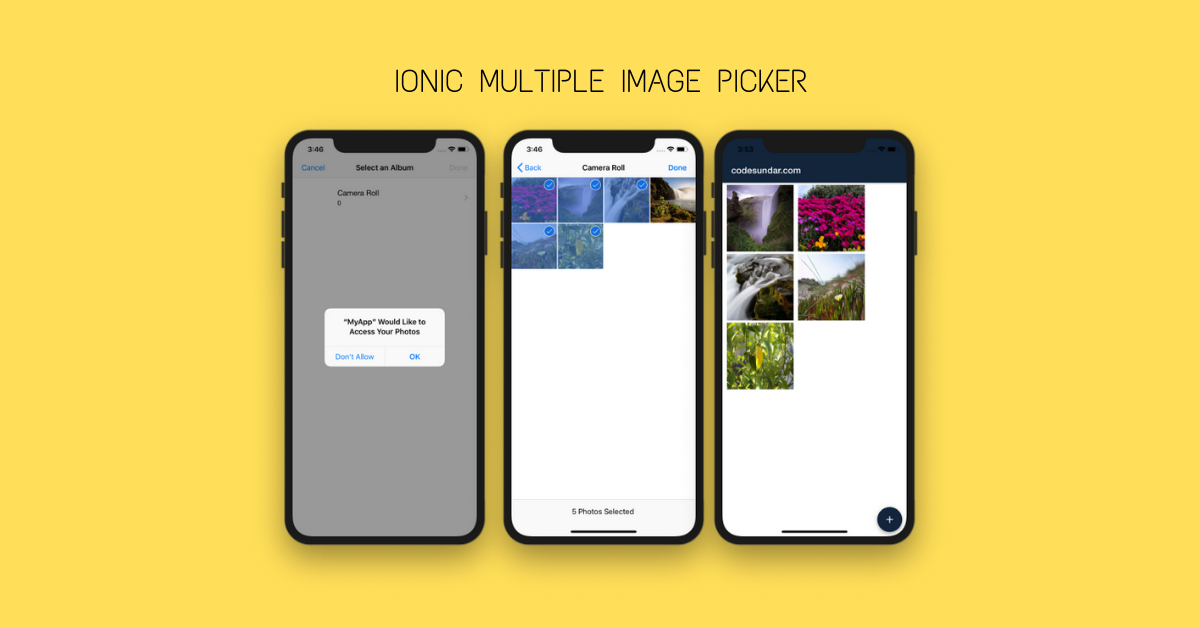
In this tutorial, we’re going to create a simple image gallery app using ionic & multiple image picker.
Let’s start
Step 1: Create a new ionic project & Change your working directory
ionic <span class="hljs-built_in">start</span> imagePicker blank
<span class="hljs-built_in">cd</span> imagePicker
Step 2: Add the required platform
ionic cordova platform <span class="hljs-keyword">add</span><span class="bash"> android
</span>ionic cordova platform <span class="hljs-keyword">add</span><span class="bash"> ios</span>
Step 3: Add Image Picker Plugin & npm modules
ionic cordova plugin <span class="hljs-built_in">add</span> cordova-plugin-telerik-imagepicker --variable PHOTO_LIBRARY_USAGE_DESCRIPTION=<span class="hljs-string">"App wants to access your gallery"</span>

npm install --<span class="hljs-built_in">save</span> @ionic-<span class="hljs-keyword">native</span>/<span class="hljs-built_in">image</span>-picker
Step 4: Once we have added our npm modules and dependencies, we have to import & declare our plugin into app.module.ts
<span class="hljs-keyword">import</span> { NgModule } <span class="hljs-keyword">from</span> <span class="hljs-string">'@angular/core'</span>;
<span class="hljs-keyword">import</span> { BrowserModule } <span class="hljs-keyword">from</span> <span class="hljs-string">'@angular/platform-browser'</span>;
<span class="hljs-keyword">import</span> { RouteReuseStrategy } <span class="hljs-keyword">from</span> <span class="hljs-string">'@angular/router'</span>;

<span class="hljs-keyword">import</span> { IonicModule, IonicRouteStrategy } <span class="hljs-keyword">from</span> <span class="hljs-string">'@ionic/angular'</span>;
<span class="hljs-keyword">import</span> { SplashScreen } <span class="hljs-keyword">from</span> <span class="hljs-string">'@ionic-native/splash-screen/ngx'</span>;
<span class="hljs-keyword">import</span> { StatusBar } <span class="hljs-keyword">from</span> <span class="hljs-string">'@ionic-native/status-bar/ngx'</span>;

<span class="hljs-keyword">import</span> { AppComponent } <span class="hljs-keyword">from</span> <span class="hljs-string">'./app.component'</span>;
<span class="hljs-keyword">import</span> { AppRoutingModule } <span class="hljs-keyword">from</span> <span class="hljs-string">'./app-routing.module'</span>;

<span class="hljs-keyword">import</span> { ImagePicker } <span class="hljs-keyword">from</span> <span class="hljs-string">'@ionic-native/image-picker/ngx'</span>;

@NgModule({
  declarations: [AppComponent],
  entryComponents: [],
  imports: [BrowserModule, IonicModule.forRoot({ mode: <span class="hljs-string">'md'</span> }), AppRoutingModule],
  providers: [
    StatusBar,
    SplashScreen,
    ImagePicker,
    { provide: RouteReuseStrategy, useClass: IonicRouteStrategy }
  ],
  bootstrap: [AppComponent]
})
<span class="hljs-keyword">export</span> <span class="hljs-class"><span class="hljs-keyword">class</span> <span class="hljs-title">AppModule</span> { }</span>
Step 5:
<span class="hljs-tag"><<span class="hljs-name">ion-fab</span> <span class="hljs-attr">vertical</span>=<span class="hljs-string">"bottom"</span> <span class="hljs-attr">horizontal</span>=<span class="hljs-string">"end"</span> <span class="hljs-attr">slot</span>=<span class="hljs-string">"fixed"</span>></span>
    <span class="hljs-tag"><<span class="hljs-name">ion-fab-button</span> (<span class="hljs-attr">click</span>)=<span class="hljs-string">"getPictures()"</span>></span>
        <span class="hljs-tag"><<span class="hljs-name">ion-icon</span> <span class="hljs-attr">name</span>=<span class="hljs-string">"add"</span>></span><span class="hljs-tag"></<span class="hljs-name">ion-icon</span>></span>
    <span class="hljs-tag"></<span class="hljs-name">ion-fab-button</span>></span>
<span class="hljs-tag"></<span class="hljs-name">ion-fab</span>></span>
In the above code, we create a FAB button. When users click the fab button we’re calling getPictures() function.
getPictures() {
  <span class="hljs-keyword">this</span>.imagePicker.getPictures({
    <span class="hljs-attr">maximumImagesCount</span>: <span class="hljs-number">5</span>,
    <span class="hljs-attr">outputType</span>: <span class="hljs-number">1</span>
  }).then(<span class="hljs-function"><span class="hljs-params">selectedImg</span> =></span> {
    selectedImg.forEach(<span class="hljs-function"><span class="hljs-params">i</span> =></span> <span class="hljs-keyword">this</span>.images.push(<span class="hljs-string">"data:image/jpeg;base64,"</span> + i));
  })
}
This getPictures() will get only 5 images & return the output as base64 string. Now using the images array we can create a Grid view for displaying selected images
<span class="xml">  <span class="hljs-tag"><<span class="hljs-name">ion-grid</span> *<span class="hljs-attr">ngIf</span>=<span class="hljs-string">"images.length != 0"</span>></span>
      <span class="hljs-tag"><<span class="hljs-name">ion-col</span> *<span class="hljs-attr">ngFor</span>=<span class="hljs-string">"let image of images"</span>></span>
          <span class="hljs-tag"><<span class="hljs-name">img</span> <span class="hljs-attr">src</span>=<span class="hljs-string">"</span></span></span><span class="hljs-template-variable">{{image}}</span><span class="xml"><span class="hljs-tag"><span class="hljs-string">"</span> <span class="hljs-attr">style</span>=<span class="hljs-string">"height: 150px;width:150px"</span> /></span>
      <span class="hljs-tag"></<span class="hljs-name">ion-col</span>></span>
  <span class="hljs-tag"></<span class="hljs-name">ion-grid</span>></span></span>
Here, we’re displaying gridview if images.length != 0 & we created columns for displaying images. Since we’ve using <ion-grid> this will be responsive
Common mistakes
- This won’t work on the browser, you must test it on simulator / real device
- You must give a proper permission to access; (Phone Settings => Apps => your app name => Permission & Enable all required permissions)
Output